Digital code locks are most common in security systems. An electronic lock or digital lock is a device which has an electronic control assembly attached to it. They are provided with an access control system.
This system allows the user to unlock the device with a password. The password is entered by making use of a keypad. The user can also set his password to ensure better protection.
In this project, major components include a keypad, LCD and the controller Arduino. This article describes the making of an electronic code lock using Arduino.
Components Required
The following components are required for making the digital code lock
- Arduino Uno
- 16×2 LCD Display
- 4×4 keypad
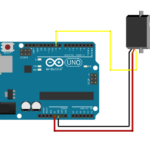
- Relay
- 1K Resistors Qty. 3
- BC548
- LEDs
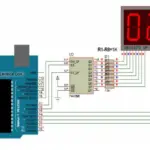
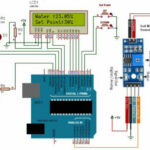
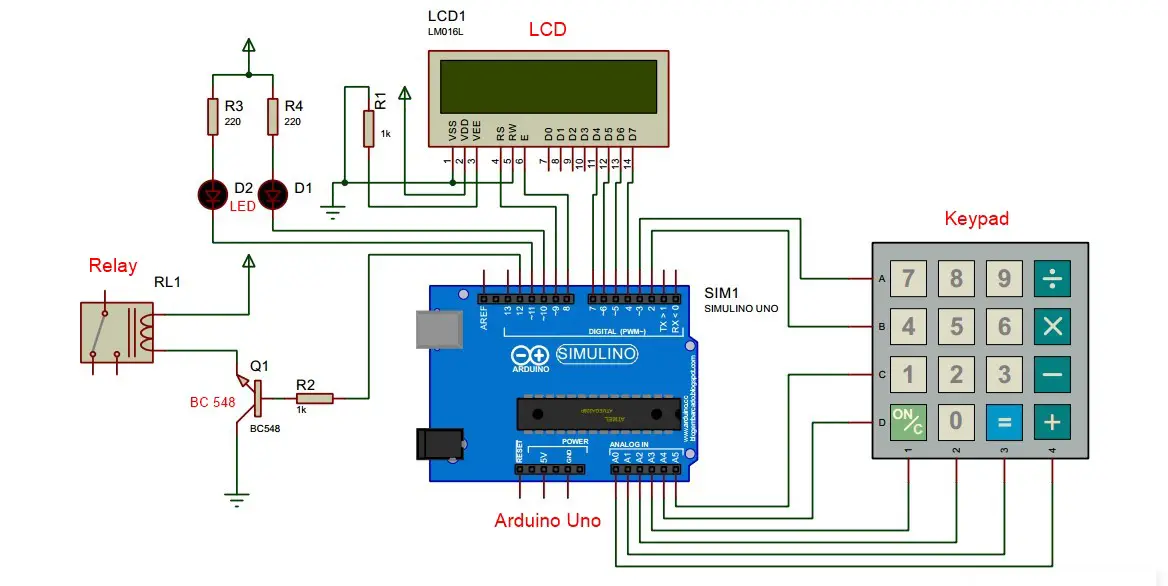
Digital Code Lock Circuit
Code lock circuit is constructed around Arduino Uno, using LCD and keypad.
LCD and keypad forms the user interface for entering the password and displaying related messages such as “Invalid password”, “Door open”, etc.
Two LEDs are provided to indicate the status of door whether it is locked or open. To operate latch/lock we are using Relay which can be connected to the electronic actuator or solenoid.

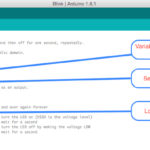
Program Code for Arduino Digital Code Lock
The program is constructed using two libraries “LiquidCrystal” and “Keypad”.
In setup, we initialize all the IO connections and LCD, Keypad.
In the main loop, we are taking pressed keys in array “code[]”, Once the four digits are entered we stop accepting keys.
We are using numeric keys and ‘C’, “=” key. ‘C’ key is used to lock or clear the display in case the wrong password is entered.
After entering the password ‘=’ key acts as ok. If the password is the correct door is kept unlocked for few seconds. If it is incorrect message will be displayed.
Digital Lock Using Arduino Code
/* Digital Code Lock Demo */
#include <Keypad.h>
#include <LiquidCrystal.h>
// initialize the library with the numbers of the interface pins
LiquidCrystal lcd (9, 8, 7, 6, 5, 4);
const byte ROWS = 4; //four rows
const byte COLS = 4; //four columns
//define the cymbols on the buttons of the keypads
char hexaKeys [ ROWS ][ COLS ] = {
{‘7′,’8′,’9′,’/’},
{‘4′,’5′,’6′,’*’},
{‘1′,’2′,’3′,’-‘},
{‘C’,’0′,’=’,’+’}
};
byte rowPins [ ROWS ] = {3, 2, 19, 18}; //connect to the row pinouts of the keypad
byte colPins [ COLS ] = {17, 16, 15, 14}; //connect to the column pinouts of the keypad
//initialize an instance of class NewKeypad
Keypad customKeypad = Keypad ( makeKeymap ( hexaKeys ), rowPins , colPins , ROWS ,
COLS );
const int LED_RED =10; //Red LED
const int LED_GREEN =11; //Green LED
const int RELAY =12; //Lock Relay or motor
char keycount =0;
char code [4]; //Hold pressed keys
//=================================================================
// SETUP
//=================================================================
void setup (){
pinMode ( LED_RED , OUTPUT );
pinMode ( LED_GREEN , OUTPUT );
pinMode ( RELAY , OUTPUT );
// set up the LCD’s number of columns and rows:
lcd . begin (16, 2);
// Print a message to the LCD.
lcd . print (“Password Access:”);
lcd . setCursor (0,1); //Move coursor to second Line
// Turn on the cursor
lcd . cursor ();
digitalWrite ( LED_GREEN , HIGH ); //Green LED Off
digitalWrite ( LED_RED , LOW ); //Red LED On
digitalWrite ( RELAY , LOW ); //Turn off Relay (Locked)
}//
=================================================================
// LOOP
//=================================================================
void loop (){
char customKey = customKeypad . getKey ();
if ( customKey && ( keycount <4) && ( customKey !=’=’) && ( customKey !=’C’)){
//lcd.print(customKey); //To display entered keys
lcd . print (‘*’); //Do not display entered keys
code [ keycount ]= customKey ;
keycount ++;
}
if(customKey == ‘C’) //Cancel/Lock Key is pressed clear display and lock
{
Lock (); //Lock and clear display
}
if(customKey == ‘=’) //Check Password and Unlock
{
if(( code [0]==’1′) && ( code [1]==’2′) && ( code [2]==’3′) && ( code [3]==’4′)) //Match the
password. Default password is “1234”
{
digitalWrite ( LED_GREEN , LOW ); //Green LED Off
digitalWrite ( LED_RED , HIGH ); //Red LED On
digitalWrite ( RELAY , HIGH ); //Turn on Relay (Unlocked)
lcd . setCursor (0,1);
lcd . print (“Door Open “);
delay (4000); //Keep Door open for 4 Seconds
Lock ();
}
else
{
lcd . setCursor (0,1);
lcd . print (“Invalid Password”); //Display Error Message
delay (1500); //Message delay
Lock ();
}
}
}
//=================================================================
// LOCK and Update Display
//=================================================================
void Lock ()
{
lcd . setCursor (0,1);
lcd . print (“Door Locked “);
delay (1500);
lcd . setCursor (0,1);
lcd . print (” “); //Clear Password
lcd . setCursor (0,1);
keycount =0;
digitalWrite ( LED_GREEN , HIGH ); //Green LED Off
digitalWrite ( LED_RED , LOW ); //Red LED On
digitalWrite ( RELAY , LOW ); //Turn off Relay (Locked)
}